
I adapted this edging from the classic Dayflower lace pattern in Barbara Walker’s Treasuries. This will work beautifully with, “Assembly Tab Braid”, if you work it as an applied edging to the holes in the braid, so that you can encase another fabric in your edging, like a pillowcase edge, sleeve, hem, Easter dress edges, or some visible mending. Let me know what you did with it! I love to see your work.
(If you are a designer, I’d appreciate a mention, but by all means, edge something lovey in Dayflowers.)
I’ve charted the edging so that it begins with a point then widens, and finally tapers again. It can be worked as a flat edging, but it’s hard to get a good start and stop point. Someday I’ll fill in the triangles where a flower isn’t on a flat piece, maybe you’ll beat me to it! I added a lot of grey no stitch boxes to the chart, because I like being able to see which stitches become parts of the flower, and where the vines diverge. If jumping over the not a stitch gap is hard on your eyes, it might help to place a sticky note over the boxes that you are working. Then you can see which stitches you have already worked, and not worry about the ones to come. And there are always the written instructions if your mind works better that way.
Cast on 2 sts provisionally.
Work Mary Thomas’s Picot Edging (This post has a photo tutorial. It can feel odd to start a row with a yarn over.)

Row 1: Yo, sl1, k1, psso. (2 sts)
Rep Row 1 until there are 4 loops, do not turn. Drop yarn. If using double pointed needles, with the back point of the needle, pick up the 4 loops. Pick up the provisionally cast on sts. Turn. Pick up yarn. (8 sts) Continue on with Row 1 of the Dayflower Edging instructions or chart.
If using another configuration of needle, turn, slip the two stitches onto the other needle, then pick up the 4 picot loops and the 2 provisionally cast on stitches. Then slide all 8 stitches onto the other needle.
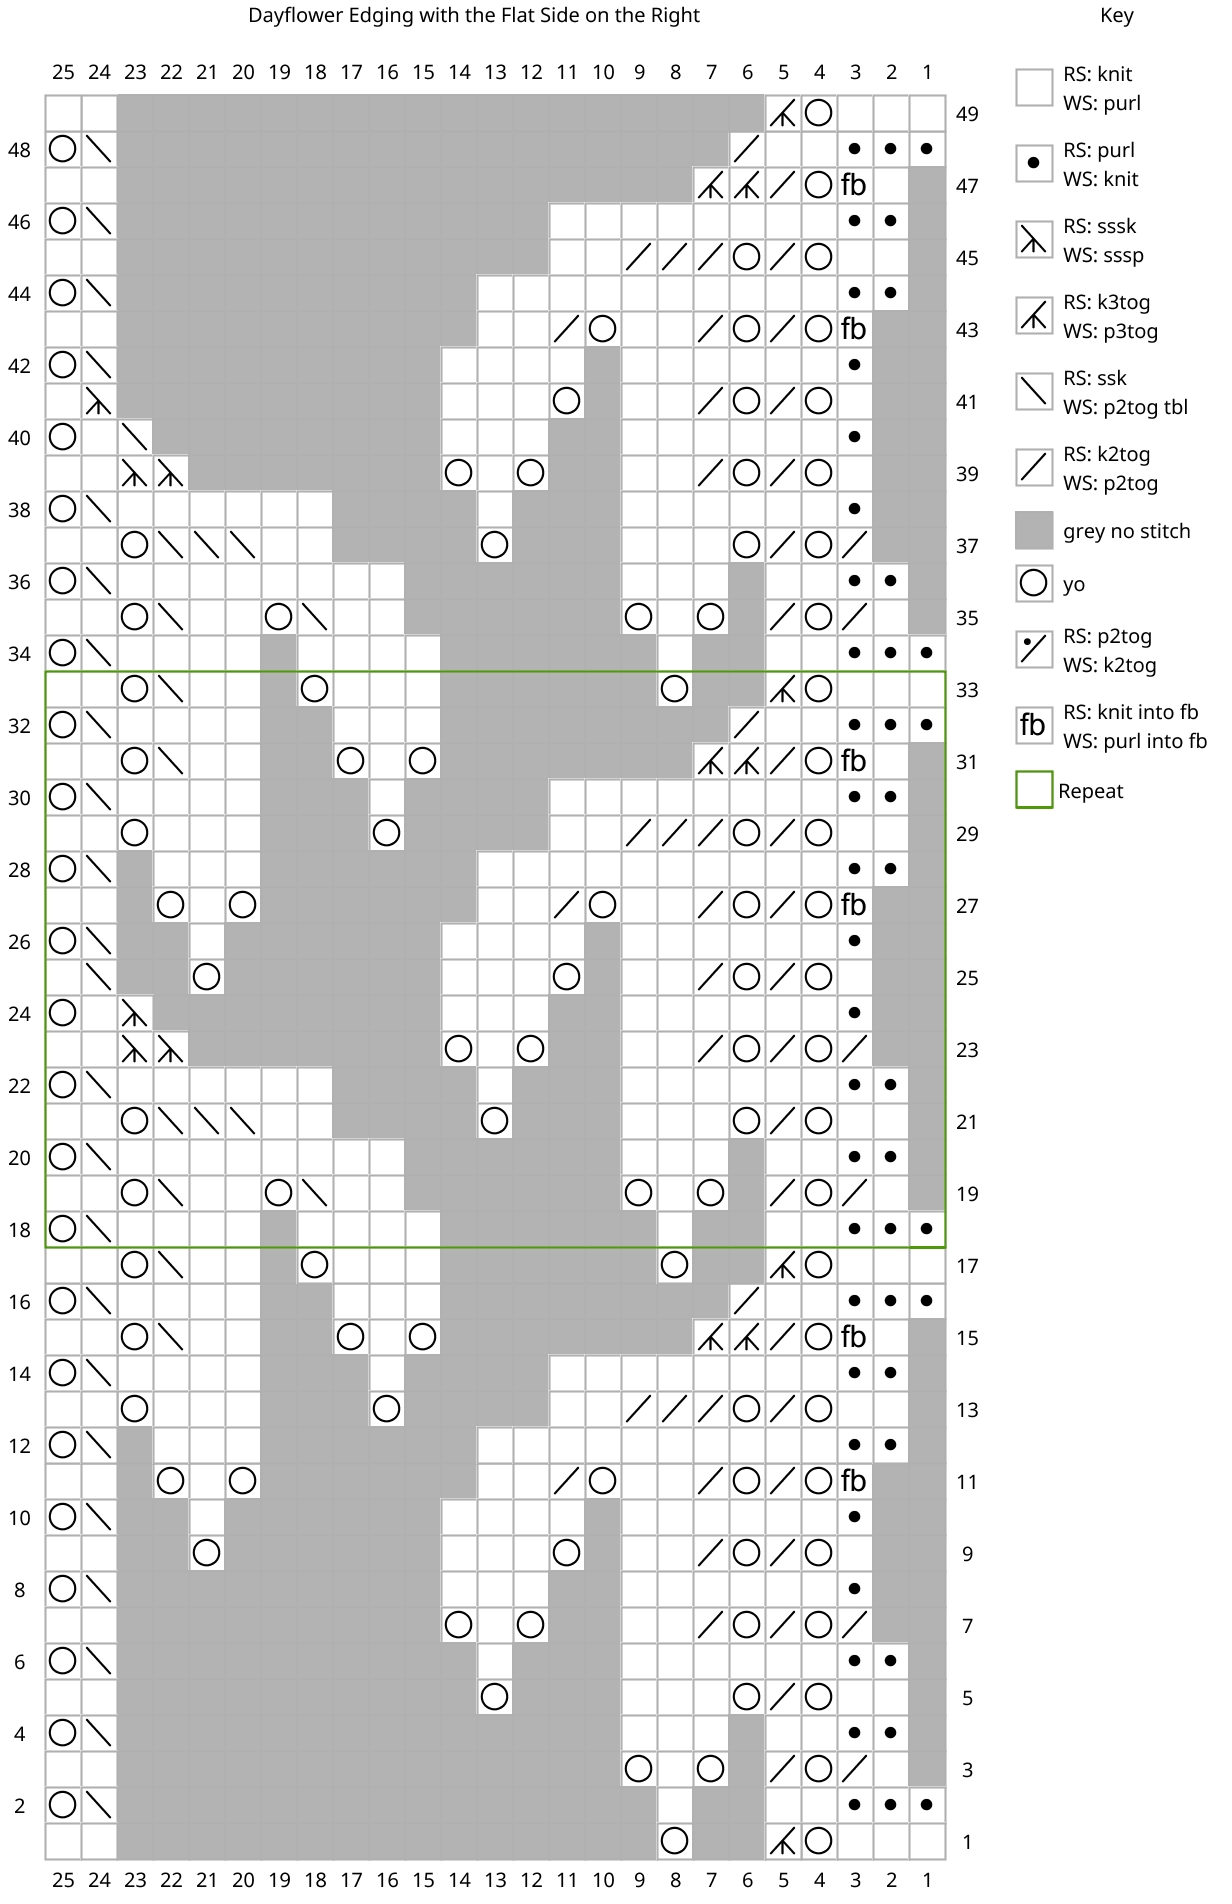
Chart Dayflower Edging with the Flat Side on the Right
Row 1 (RS): K3, yo, k3tog, yo, k2. (8 sts)
Row 2 (WS): Yo, p2tog tbl, p3, k3.
Row 3: K1, (k2tog, yo) × 2, k1, yo, k2. (9 sts)
Row 4: Yo, p2tog tbl, p5, k2.
Row 5: K2, yo, k2tog, yo, k3, yo, k2. (11 sts)
Row 6: Yo, p2tog tbl, p7, k2.
Row 7: (K2tog, yo) × 2, k2tog, k2, yo, k1, yo, k2. (12 sts)
Row 8: Yo, p2tog tbl, p9, k1.
Row 9: K1, (yo, k2tog) × 2, k2, yo, k3, yo, k2. (14 sts)
Row 10: Yo, p2tog tbl, p11, k1.
Row 11: Kfb, yo, k2tog, (yo, k2tog, k2) × 2, yo, k1, yo, k2. (17 sts)
Row 12: Yo, p2tog tbl, p13, k2.
Row 13: K2, yo, k2tog, yo, k2tog × 3, k2, yo, k3, yo, k2.
Row 14: Yo, p2tog tbl, p13, k2.
Row 15: K1, kfb, yo, k2tog, k3tog × 2, yo, k1, yo, k2, ssk, yo, k2. (16 sts)
Row 16: Yo, p2tog tbl, p7, p2tog, p2, k3. (15 sts)
Row 17: K3, yo, k3tog, yo, k3, yo, k2, ssk, yo, k2. (16 sts)
Row 18: Yo, p2tog tbl, p11, k3.
Row 19: K1, (k2tog, yo) × 2, k1, (yo, k2, ssk) × 2, yo, k2. (17 sts)
Row 20: Yo, p2tog tbl, p13, k2.
Row 21: K2, yo, k2tog, yo, k3, yo, k2, ssk × 3, yo, k2.
Row 22: Yo, p2tog tbl, p13, k2.
Row 23: (K2tog, yo) × 2, k2tog, k2, yo, k1, yo, sssk × 2, k2. (14 sts)
Row 24: Yo, p1, sssp, p9, k1. (13 sts)
Row 25: K1, (yo, k2tog) × 2, k2, yo, k3, yo, ssk, k1. (14 sts)
Row 26: Yo, p2tog tbl, p11, k1.
Row 27: Kfb, yo, k2tog, (yo, k2tog, k2) × 2, yo, k1, yo, k2. (17 sts)
Row 28: Yo, p2tog tbl, p13, k2.
Row 29: K2, yo, k2tog, yo, k2tog × 3, k2, yo, k3, yo, k2.
Row 30: Yo, p2tog tbl, p13, k2.
Row 31: K1, kfb, yo, k2tog, k3tog × 2, yo, k1, yo, k2, ssk, yo, k2. (16 sts)
Row 32: Yo, p2tog tbl, p7, p2tog, p2, k3. (15 sts)
Row 33: K3, yo, k3tog, yo, k3, yo, k2, ssk, yo, k2. (16 sts)
Repeat rows 18-33 until the piece is 2 flowers short of desired length (accounting for blocking of course)
Row 34: Yo, p2tog tbl, p11, k3.
Row 35: K1, (k2tog, yo) × 2, k1, (yo, k2, ssk) × 2, yo, k2. (17 sts)
Row 36: Yo, p2tog tbl, p13, k2.
Row 37: (K2tog, yo) × 2, k3, yo, k2, ssk × 3, yo, k2. (16 sts)
Row 38: Yo, p2tog tbl, p13, k1.
Row 39: K1, (yo, k2tog) × 2, k2, yo, k1, yo, sssk × 2, k2. (14 sts)
Row 40: Yo, p1, p2tog tbl, p9, k1. (13 sts)
Row 41: K1, (yo, k2tog) × 2, k2, yo, k3, sssk, k1.
Row 42: Yo, p2tog tbl, p10, k1.
Row 43: Kfb, (yo, k2tog) × 2, k2, yo, k2tog, k4. (14 sts)
Row 44: Yo, p2tog tbl, p10, k2.
Row 45: K2, yo, k2tog, yo, k2tog × 3, k4. (12 sts)
Row 46: Yo, p2tog tbl, p8, k2.
Row 47: K1, kfb, yo, k2tog, k3tog × 2, k2. (9 sts)
Row 48: Yo, p2tog tbl, p2tog, p2, k3. (8 sts)
Row 49: K3, yo, k3tog, k2. (7 sts)
Stitch Glossary
grey no stitch : No stitch.
k2tog : Knit 2 stitches together.
k3tog : Knit 3 stitches together.
knit into fb : Knit into front and back of same stitch.
knit : Knit.
p2tog : Purl 2 together.
p2tog tbl : Purl 2 together through back loops.
purl : Purl.
ssk : Slip, slip, knit.
sssk : Slip, slip, slip, knit.
yo : Yarn over.
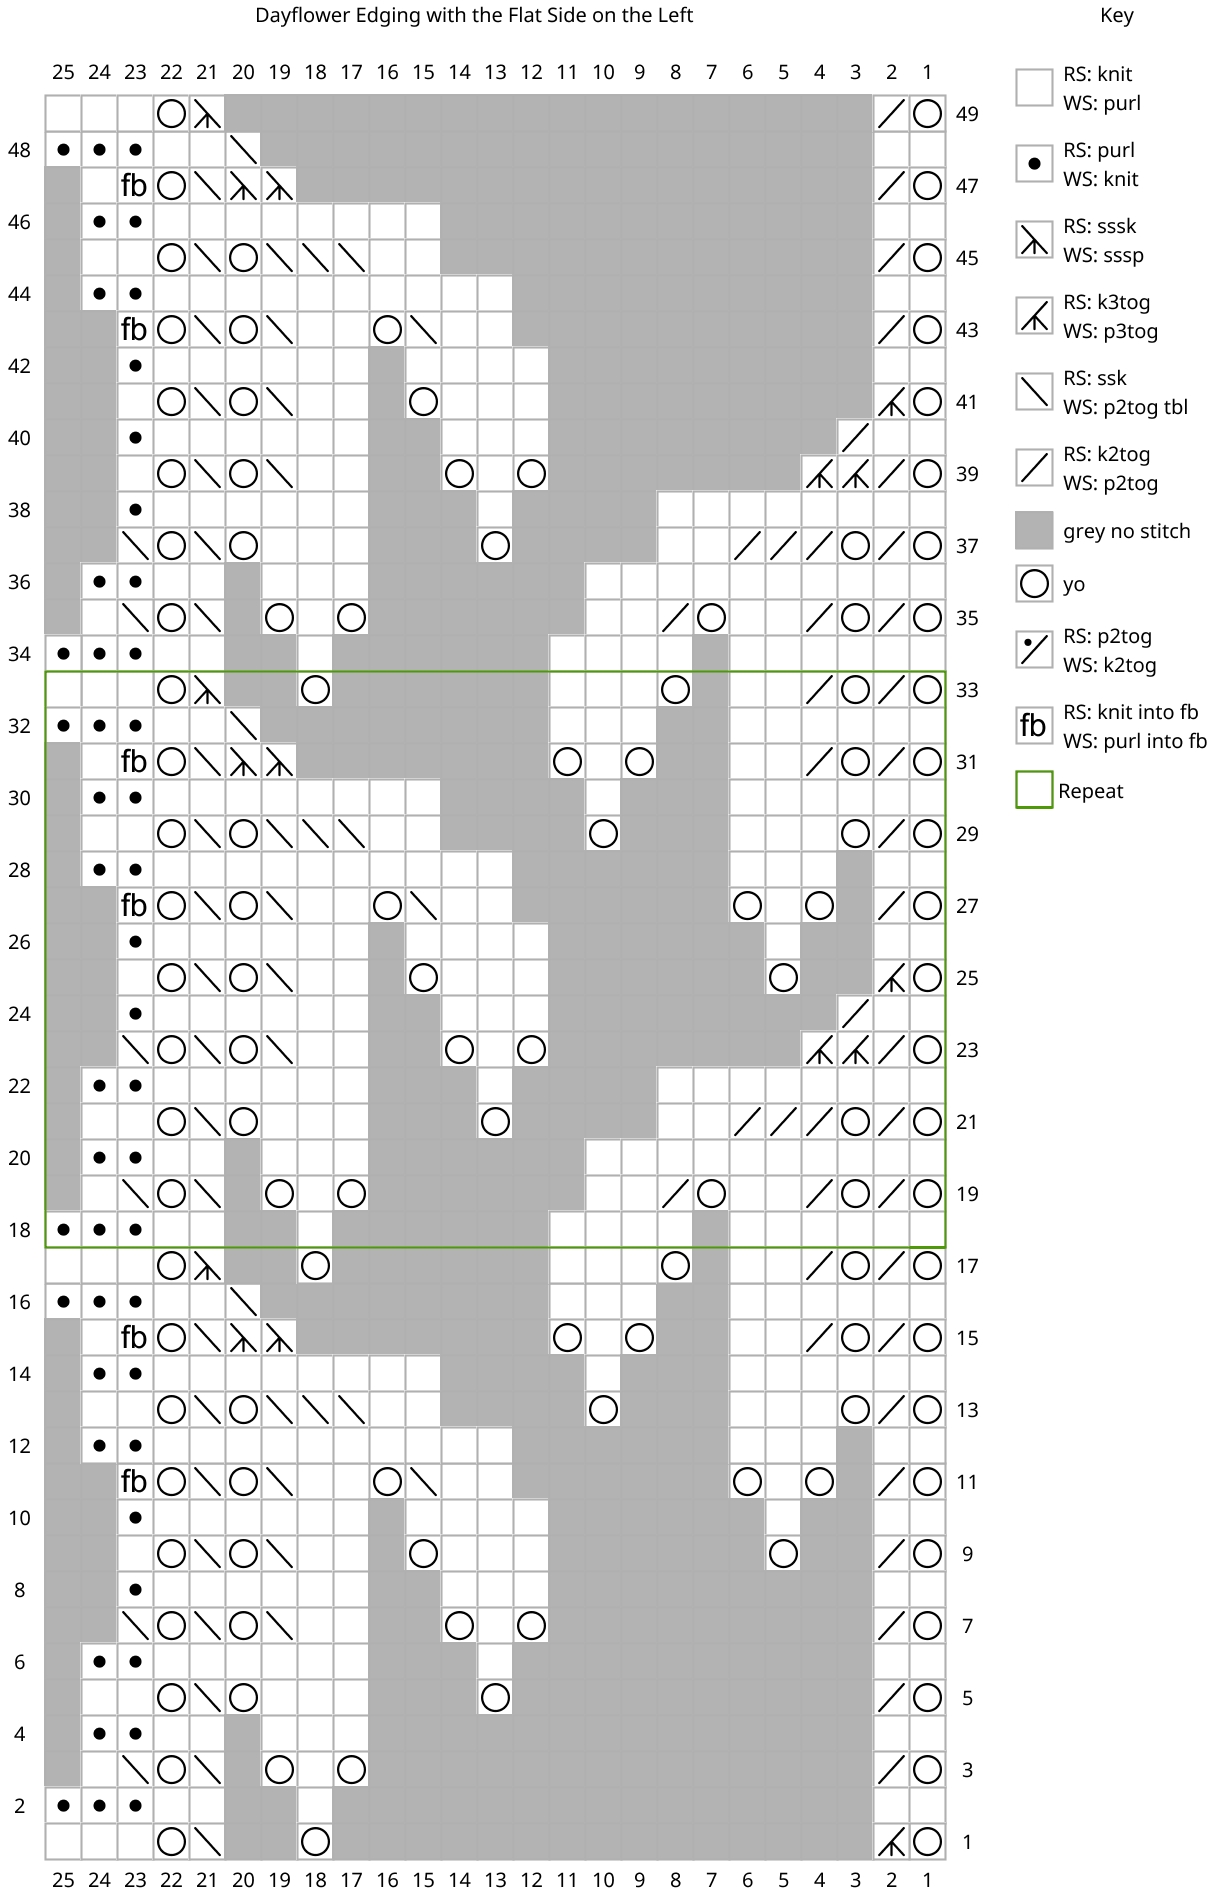
Dayflower Edging with the flat side on the Left
Row 1 (RS): Yo, k3tog, yo, ssk, yo, k3. (8 sts)
Row 2 (WS): K3, p5.
Row 3: Yo, k2tog, yo, k1, (yo, ssk) x 2, k1. (9 sts)
Row 4: K2, p7.
Row 5: Yo, k2tog, yo, k3, yo, ssk, yo, k2. (11 sts)
Row 6: K2, p9.
Row 7: Yo, k2tog, yo, k1, yo, k2, (ssk, yo) x 2, ssk. (12 sts)
Row 8: K1, p11.
Row 9: Yo, k2tog, yo, k3, yo, k2, (ssk, yo) x 2, k1. (14 sts)
Row 10: K1, p13.
Row 11: Yo, k2tog, yo, k1, (yo, k2, ssk) x 2, yo, ssk, yo, kfb. (17 sts)
Row 12: K2, p15.
Row 13: Yo, k2tog, yo, k3, yo, k2, ssk x 3, yo, ssk, yo, k2.
Row 14: K2, p15.
Row 15: (Yo, k2tog) x 2, k2, yo, k1, yo, sssk x 2, ssk, yo, kfb, k1. (16 sts)
Row 16: K3, p2, p2tog tbl, p9. (15 sts)
Row 17: (Yo, k2tog) x 2, k2, yo, k3, yo, sssk, yo, k3. (16 sts)
Row 18: K3, p13.
Row 19: Yo, k2tog, (yo, k2tog, k2) x 2, yo, k1, (yo, ssk) x 2, k1. (17 sts)
Row 20: K2, p15.
Row 21: Yo, k2tog, yo, k2tog x 3, k2, yo, k3, yo, ssk, yo, k2.
Row 22: K2, p15.
Row 23: Yo, k2tog, k3tog x 2, yo, k1, yo, k2, (ssk, yo) x 2, ssk. (14 sts)
Row 24: K1, p9, p2tog, p2. (13 sts)
Row 25: Yo, k3tog, yo, k3, yo, k2, (ssk, yo) x 2, k1. (14 sts)
Row 26: K1, p13.
Row 27: Yo, k2tog, yo, k1, (yo, k2, ssk) x 2, yo, ssk, yo, kfb. (17 sts)
Row 28: K2, p15.
Row 29: Yo, k2tog, yo, k3, yo, k2, ssk x 3, yo, ssk, yo, k2.
Row 30: K2, p15.
Row 31: (Yo, k2tog) x 2, k2, yo, k1, yo, sssk x 2, ssk, yo, kfb, k1. (16 sts)
Row 32: K3, p2, p2tog tbl, p9. (15 sts)
Row 33: (Yo, k2tog) x 2, k2, yo, k3, yo, sssk, yo, k3. (16 sts)
Repeat Rows 18-33 until the edging is 2 flowers short of the end.
Row 34: K3, p13.
Row 35: Yo, k2tog, (yo, k2tog, k2) x 2, yo, k1, (yo, ssk) x 2, k1. (17 sts)
Row 36: K2, p15.
Row 37: Yo, k2tog, yo, k2tog x 3, k2, yo, k3, (yo, ssk) x 2. (16 sts)
Row 38: K1, p15.
Row 39: Yo, k2tog, k3tog x 2, yo, k1, yo, k2, (ssk, yo) x 2, k1. (14 sts)
Row 40: K1, p9, p2tog, p2. (13 sts)
Row 41: Yo, k3tog, k3, yo, k2, (ssk, yo) x 2, k1.
Row 42: K1, p12.
Row 43: Yo, k2tog, (k2, ssk, yo) x 2, ssk, yo, kfb. (14 sts)
Row 44: K2, p12.
Row 45: Yo, k2tog, k2, ssk x 3, yo, ssk, yo, k2. (12 sts)
Row 46: K2, p10.
Row 47: Yo, k2tog, sssk x 2, ssk, yo, kfb, k1. (9 sts)
Row 48: K3, p2, p2tog tbl, p2. (8 sts)
Row 49: Yo, k2tog, sssk, yo, k3. (7 sts)
Bind off using the nearly matching bind off:
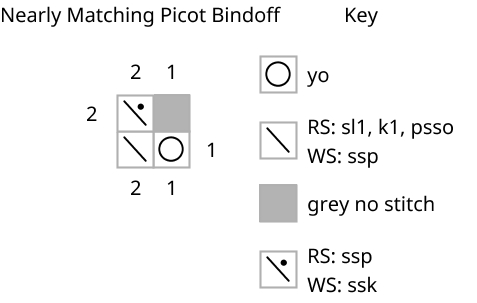
To bind off: Row 1: Yo, sl1, k1, psso. Turn.
Row 2: Sl1, k1, psso. Turn
Repeat rows 1 and 2 across your fabric until there is 1 st left, pull thread through loop.
I usually update the blog on Fridays, but Tuesday, January 5, 2021, I will be announcing a new pattern!
Thank you for reading my blog. Happy New Year! God bless you.